
In e-commerce, visuals are key to grabbing attention and driving conversions. Simple product images aren’t always enough. Highlighting products from different angles, adding lifestyle shots, customer photos, and installation infographics can set you apart. To add additional images, one of the best ways is to create a custom Image Gallery Tab in the WooCommerce product page.
Importantly, modern shoppers want to explore more product details before making a purchase. Instead of cluttering the main product gallery, a dedicated image gallery tab allows you to add multiple product visuals, such as Additional Images, Real-Life-Shoots, Before-and-After Images, or any Infographics, effortlessly — all without coding.
However, to create additional product image tabs, you can use a popular product tabs plugin, such as Smart Tabs. Using it, you can easily upload multiple images, rearrange visually, and display them beautifully on your product pages, helping to increase conversion and boost sales.
In this blog, I’ll show you how to create a custom image gallery tab using Smart Tabs.
Let’s get started!
What is the Image Gallery Tab in WooCommerce?
The Image Gallery Tab in WooCommerce is a dedicated custom product tab that allows you to display multiple product images in an organized, visually appealing way. Instead of limiting your visuals to the main product gallery, this tab creates a separate section where customers can explore extra product shots — including close-ups, color variations, packaging, or real-use photos.
Moreover, this image tab provides a more detailed and interactive view of your products, helping shoppers understand the quality, features, and design more clearly. Furthermore, it helps to build customer confidence and increase conversions.
In essence, an Image Gallery Tab transforms your WooCommerce product page into a richer visual showcase, combining style with functionality to make your products stand out and sell more.
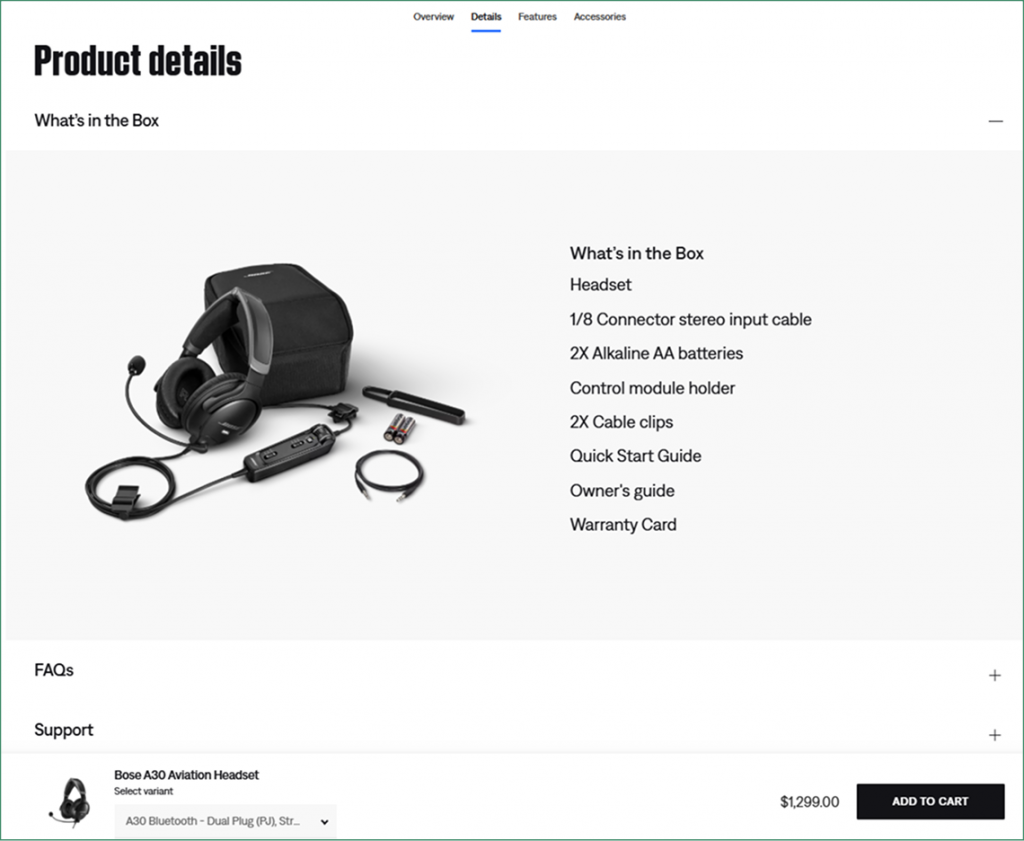
So, don’t be late. Let’s create an image gallery tab like the world’s top brand, BOSE, as shown in the image below.
Why is An Image Gallery Tab Essential for Each WooCommerce Product Page?
Adding a Product Gallery Tab brings several advantages for both store owners and customers:
- Enhances Product Visualization – Adding detailed product images allows customers to see products from multiple angles, close-ups, and detailed shots.
- Showcase Multiple Image Types – You can highlight lifestyle images, customer photos, infographics, awards, or before-and-after shots to increase customer trust.
- Organized and Clean Layout – Without cluttering the main gallery or description, it keeps your product page neat while highlighting additional product images.
- Improves Engagement – Interactive image galleries keep shoppers exploring your product longer. It helps customers understand product features, variations, and real-life usage before purchasing.
- Increases Sales & Boosts Conversions – Richer product visuals with detailed information can reduce customer hesitation and encourage more confident purchases.
- Builds Trust and Credibility – Visuals are key to succeeding in eCommerce. Showing detailed visuals and certifications boosts customer confidence in making purchasing decisions.
- Reduces Returns and Complaints – When customers see detailed and accurate images, they’re less likely to return items due to mismatched expectations.
Since WooCommerce doesn’t have a dedicated image tab, you can use a custom tab management plugin, like Smart Tabs. It is a responsive tab layout plugin designed for both WooCommerce and WordPress, allowing you to add custom tabs, including the Image Gallery Tab effortlessly.
How to Create An Image Gallery Tab in WooCommerce?
Adding an Image Gallery Tab to your WooCommerce product pages is effortless with Smart Tabs (formerly WP Tabs). This powerful plugin allows you to create a dedicated image gallery tab where customers can explore more product images without cluttering the main gallery.
Once installed, Smart Tabs seamlessly integrates with WooCommerce, letting you add new custom tabs directly from your WordPress dashboard. You can create a tab specifically for product visuals, such as “Image Gallery,” “Before-After Images,” “Features Infographics,“ or “What’s Inside the Box” — and easily upload multiple product photos, lifestyle shots, infographics, or even before-and-after comparisons.
Let’s learn how to add an image gallery tab using smart tabs.
Types of Images You Can Display Using Smart Tabs in WooCommerce
When you create an Image Gallery Tab with Smart Tabs, you can add multiple types of images directly to your product page:
- Main Product Images – Typically, every product has front, back, and side views. Showing your product from multiple angles helps customers understand the overall shape, size, and appearance, giving them a clear idea of what they’re buying.
- Additional Product Image Gallery – Additional product images mainly provide extra details or perspectives not covered in the main photos. For example, showing close-ups of accessories, packaging, or alternate angles. They help reduce confusion and answer common questions visually.
- Close-Up / Detail Product Features– Product detail images with infographics showcase textures, materials, and small features. By highlighting details like fabric texture and stitching, they demonstrate quality and craftsmanship, boosting customer trust.
- Lifestyle / Products in Real Life – Displaying your product in a real-world context is an effective strategy. Showcasing your product in action—such as furniture staged in a living room or shoes being worn. It allows customers to visualize its role in their lives, fostering an emotional connection that encourages purchase decisions.
- Before-and-After Images – Showing before and after images is commonly used in beauty, fitness, or cleaning products. It highlights effectiveness by showing skin improvement after using a cream. By displaying proof of results, they help build confidence in the product.
- Awards & Certificates – Displaying certifications, awards, or industry recognitions assures customers of your product’s credibility, quality, or safety. It helps reduce doubts and increase brand authority.
- Customer Photos / Social Proof – Sharing photos submitted by real customers using the product provides authenticity. It shows your product is loved and used by others, which encourages new buyers to trust and purchase.
- Inside The Box / Instructional Images – Adding visual instructions helps customers understand how to use the product correctly. Including the product assembly and installation guide, along with the “what’s inside the box” image, reduces customer confusion, returns, and support queries.
- Infographics / Comparison Images – To visually explain features, benefits, or differences, infographics and side-by-side comparisons make complex information easy to understand at a glance. They can highlight advantages over competitors, show technical specifications, or simplify detailed instructions.
So, start using the Smart Tabs image tab to enhance the product page experience, allowing shoppers to explore products more effectively and boosting engagement and conversions.
4 Simple Steps: Create Image Gallery Tabs in WooCommerce Product Page
Step 1: Get Smart Tab
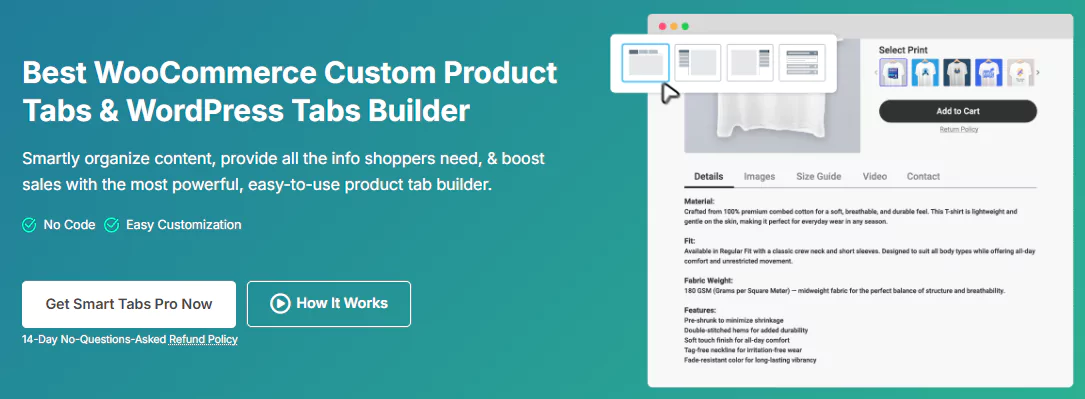
Among the best WooCommerce Custom Product Tab plugins, Smart Tabs (formerly WP Tabs) is the ultimate product tab management plugin for both WooCommerce and WordPress. Over 20000+ WooCommerce stores and WordPress business owners use WP Tabs to add, customize, and manage tabs efficiently. It allows you to add beautiful, responsive custom tabs with easy customization options, enabling you to create professional product tabs in minutes without coding.
Furthermore, using this WooCommerce product tabs plugin, you can create more than seven custom product tabs, assign them to specific products, categories, brands, or all of them, and edit them per product with no limits.
So, why wait? Let’s install Smart Tabs. It’s easy.
However, if you’re new (Future Master) to this custom tab plugin, follow this step-by-step guide, and I am sure it will help you install it within minutes.
Step 2: Create a New Tab (Image Tab)
- From your WordPress Dashboard, go to the Smart Tabs plugin. Navigate to the Product Tabs (New), click on it, and the WooCommerce Default Tabs will be displayed.
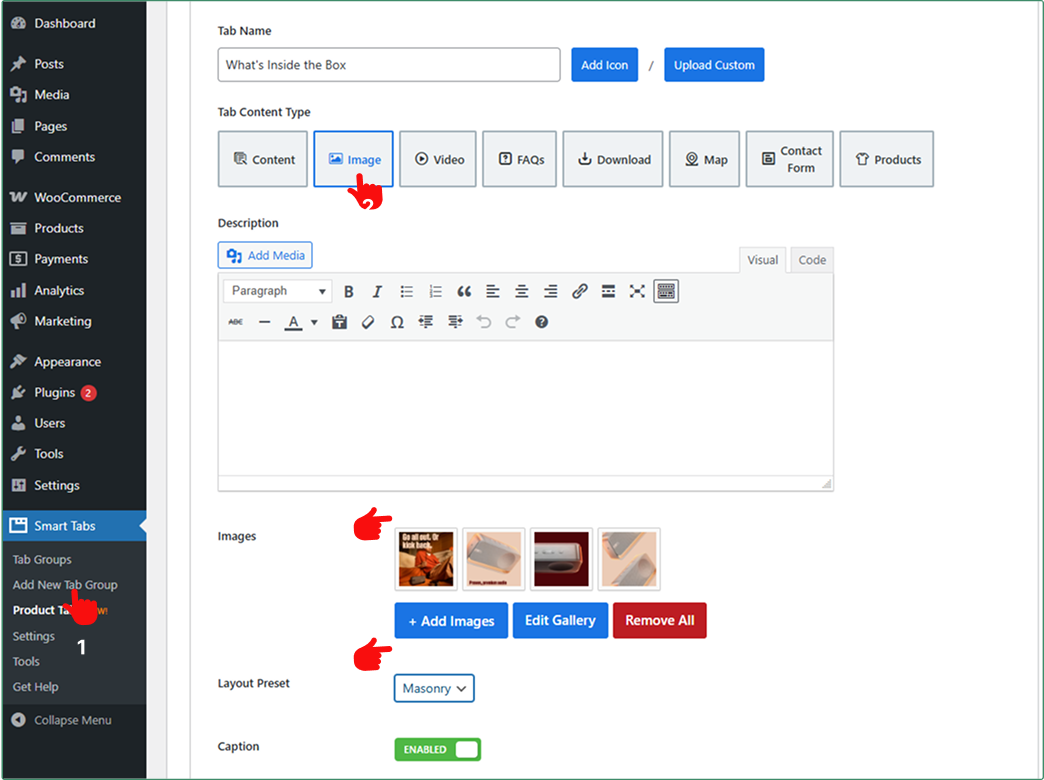
- Click on “Add New Tab“, choose the Tab Type (Image), give it a title (e.g., What’s Inside the Box), and add an icon.
- Enter the image description using the WYSIWYG editor. Then, upload the product images or infographics you want to showcase.
- Edit the image title, caption, or even add a link from the edit image gallery option. Then, set the Image Layout Preset to Grid or Masonry.
Step 3: Customize Tab Settings & Assign to the Products
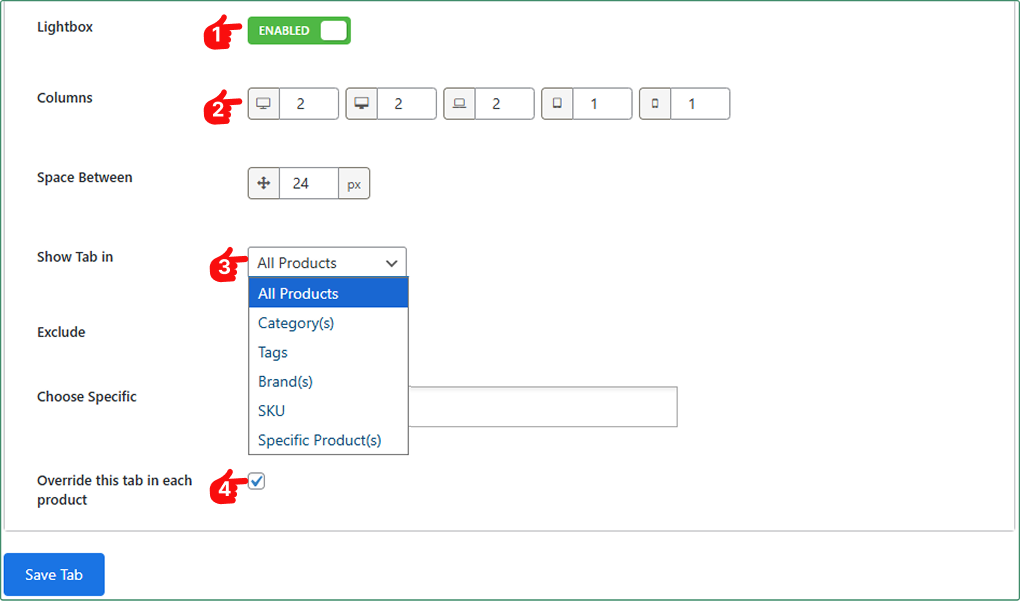
Adjust settings such as image Caption, LightBox, Set Columns, and Space Between.
- Choose whether you want to display the Image Caption and turn on the LightBox for better visibility.
- Set the custom columns and space between
Then, set your Image Tab visibility (All Products, Categories, Tags, Brands, SKUs, or Specific Products).
- Furthermore, you can exclude and hide an image tab using the “exclude” or “override” feature.
- Check, mark, and exclude it from specific products.
- Additionally, you can add any custom image from the WooCommerce product page using the override feature.
Once done, finally, hit the Save button.
Step 4: Configure Layout & Style for the Image Tab
Now, it’s time to add style to your Image Tab.
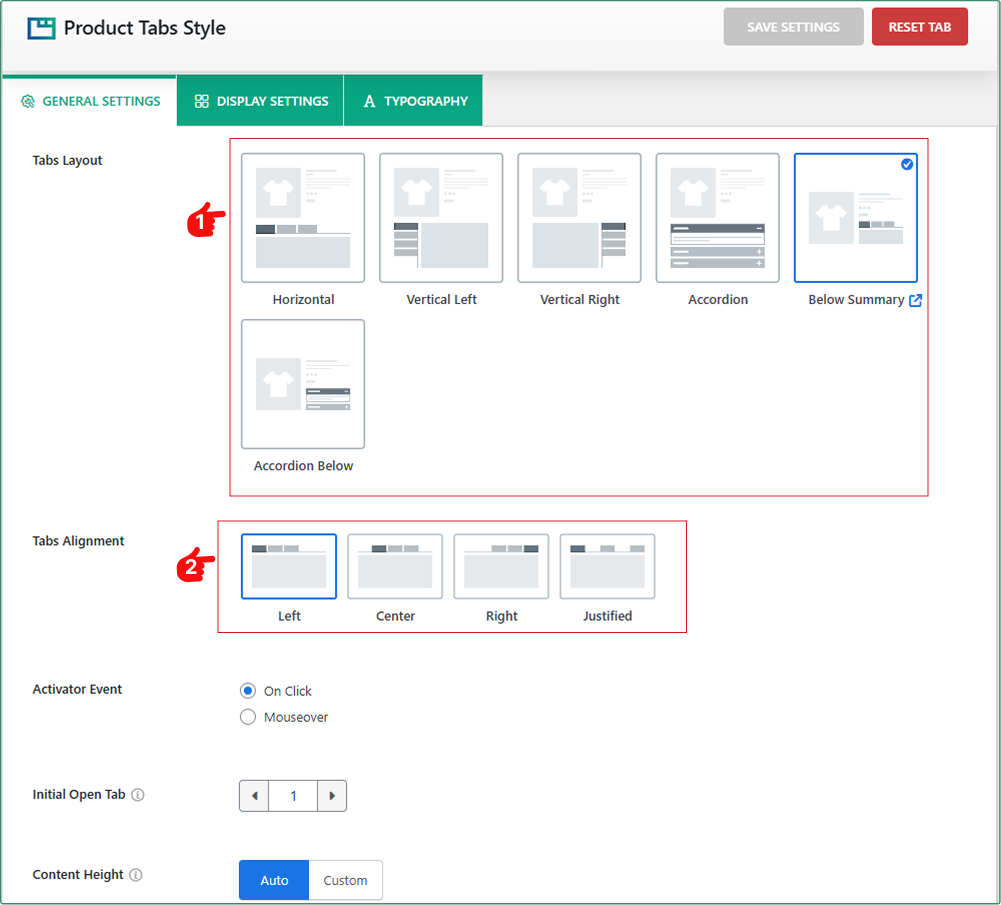
- Move to the Tab Style Tab, and Scroll to the General Settings Tab.
- Choose your preferred Tab Layouts (Horizontal, Vertical, Accordion, and more), and customize the position, alignment, and other settings.
- Then, from the Tab Display Settings, choose your preferred Tab Style.
- Set your brand typography and other elements according to your brand.
Finally, click the Save Settings button, and the Image Gallery Tab will now appear on the WooCommerce product page.
5 Pro Tips for Optimizing Product Image Gallery for Better SEO
- Use the Right Format – Go with JPEG for photos, PNG for transparency, and WebP for faster loading.
- Compress Smartly – Use tools like TinyPNG or ShortPixel to shrink file sizes without losing quality.
- Resize Properly – Match image dimensions to your site’s layout instead of uploading oversized files.
- Enable Lazy Loading – Load images only when they appear on-screen to speed up page performance.
- Use SEO-Friendly Names & Alt Text – Add clear, descriptive names and alt text to boost SEO and accessibility.
To Sum Up
A dedicated Image Gallery Tab in WooCommerce not only elevates a product presentation but also enhances customer engagement and boosts sales.
So, don’t wait. Download Smart Tabs Today, and create your own Image Gallery Tab and turn every product page into a stunning visual experience that converts.
Leave a Reply