
Need a simple, clear way to add shipping details right on your WooCommerce product page? No worries! In this post, I’ll show you how to add a shipping info tab using a custom product tab, without coding.
The shipping info helps customers understand delivery times, costs, return policies, and carrier information. If customers don’t find it easily, they hesitate, and hesitation lowers conversions.
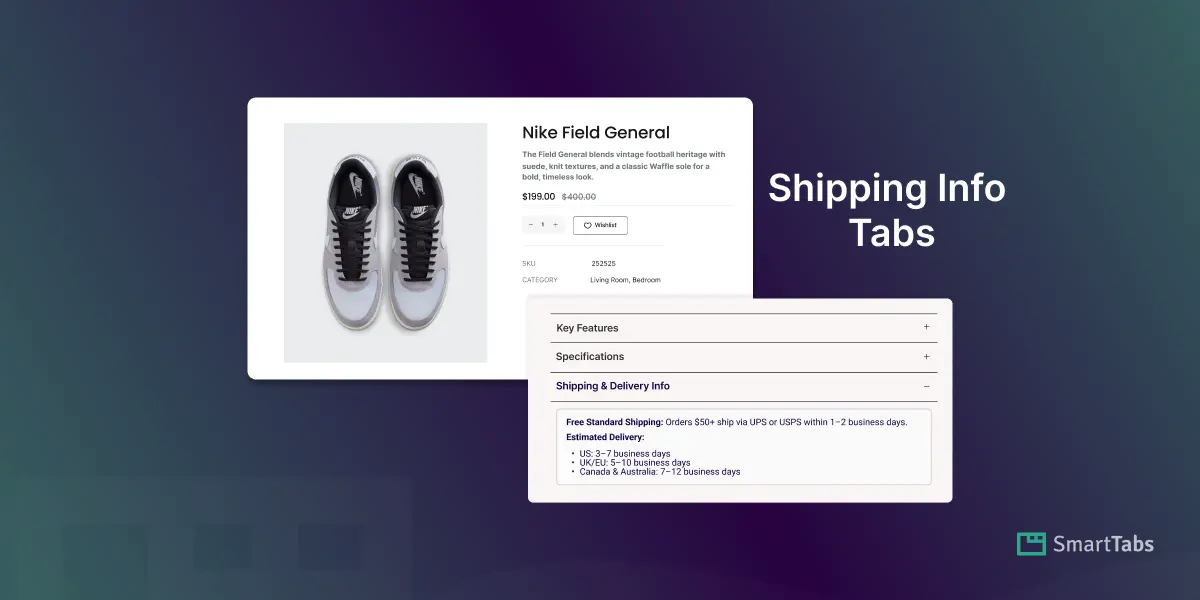
To add the Shipping Info Tab directly to the product page, you need a dedicated Custom Tab Plugin like Smart Tabs. It allows you to create a dedicated Shipping Info tab, by which you can let the shoppers know shipping info inside a tab — all without scrolling or searching.
Let’s get started!
What is a Shipping Info Tab in WooCommerce?
Shipping Info Tab is a custom product tab added to the WooCommerce product page, where you can display any important shipping-related details. It keeps your product pages organized, clean, and easy for customers to understand — leading to higher trust and better conversion rates.
Why Adding Shipping Info Matters More Than You Think
Studies show that unclear shipping information is one of the top reasons customers abandon carts. If customers can’t quickly find answers to basic questions, it might create confusion while reducing conversion. If you add shipping info right on the product page, it benefits you in multiple ways.
- Builds Trust: Customers see shipping cost, delivery time, and carrier upfront, reducing surprises.
- Reduces Cart Abandonment: Clear shipping info prevents last-minute checkout drop-offs.
- Improves UX: Tabs keep the product page organized and easy to navigate.
- Speeds Purchase Decisions: Buyers make faster choices when shipping details are visible.
- Lowers Support Requests: Fewer questions about delivery or returns for your support team.
- Boosts SEO: Shipping content adds valuable keywords, improving search visibility.
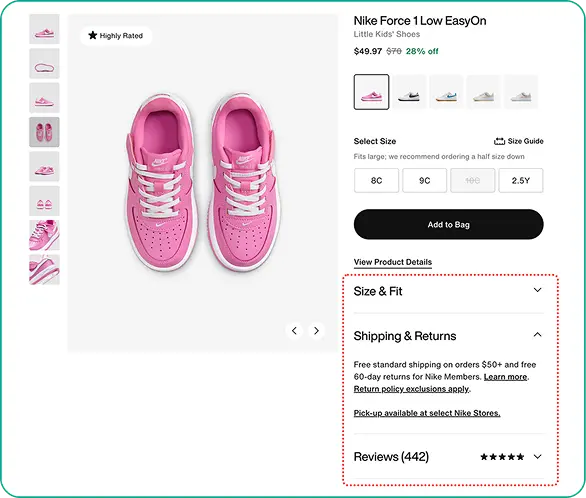
Since WooCommerce doesn’t have a built-in “Shipping Info” tab, it allows you to add shipping information inside the long product description — but it creates clutter and inconsistency across your store. A custom free tab plugin like Smart Tabs can solve this, allowing you to create a dedicated Shipping Info tab easily.
How to Add a Shipping Info Tab in WooCommerce
By default, WooCommerce only lets you add shipping information inside the long product description, but to add the shipping details directly to the product page, you need a custom tab plugin. To create the shipping info tab effortlessly, simply follow the steps below.
Step 1: Get Smart Tabs
Smart Tabs is the ultimate custom product solution for any WooCommerce store looking for modern, high-conversion product pages. It gives flexibility to add, create unlimited custom product tabs, manage, or rename WooCommerce default tabs efficiently. With 8 more responsive layouts (Horizontal, Vertical & Accordion), you can easily customize, design professional product tabs in minutes without coding.
Most importantly, it lets you assign tabs globally, specific products, categories, attributes, and more. Besides, it allows you to hide, override, or exclude tabs on individual products without any limits.
Why Add a Shipping Info Tab Using Smart Tabs Pro?
- Create Dedicated Rich-Content Tabs (Specifications, Shipping & Delivery Info, and More)
- Add the Shipping Info Tab inside the Product Tab
- Flexibility to Add Multiple Content via WYSIWYG editor (Text, Table, Images, Videos, FAQ, etc.)
- Assign Tab by Globally, Categories, Brands, or Per Product
- Exclude Tab from Specific Product
- Edit or Hide Tab Per Product at the Product Level
- Design with Horizontal, Vertical, and Collapsible Accordion tab layouts and many more customizations and styling options.
So, why wait? Let’s install Smart Tabs for free and explore how to add a Shipping Info Tab to WooCommerce, no coding needed. If you’re new to this plugin, follow this step-by-step guide to install it within minutes.
Step 2: Create a New Shipping Info Tab
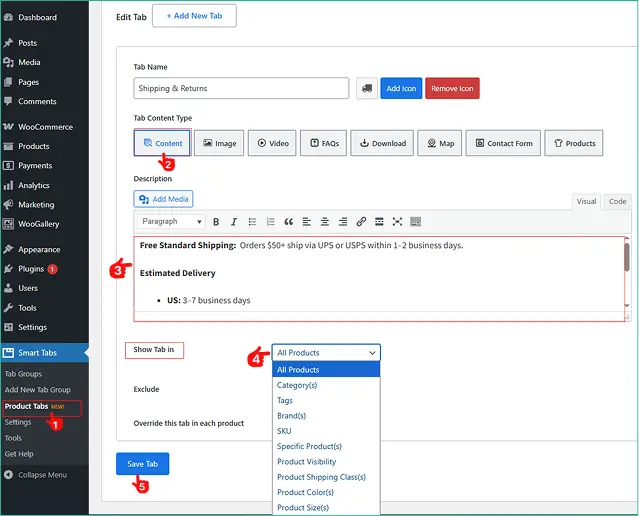
1. From your WordPress Dashboard, navigate to the Product Tabs (New). Click on it, you’ll see your default WooCommerce tabs along with options to add new ones. Click “Add New Tab”
2. Choose the Tab Type to “Content“. Give it a Name such as: Shipping Info, Delivery Details, or Shipping & Returns. Add an icon (truck, box, airplane, etc.). optional.
3. Add the Shipping Details using the WYSIWYG editor. For example:
Shipping Time: “Order ships within 1–2 business days.”
Delivery Estimates: “US Shipping: 3–5 days | International: 7–14 days.”
Shipping Fees: “Free shipping on orders above $49.”
Return Policy: “30-day return guarantee with full refund.”Carrier Information: “We ship via DHL, UPS, FedEx, and USPS.”
4. Assign the Tab to Global, Categories, or Specific Products. Furthermore, you can easily exclude it from any specific products.
5. Save the Tab.
Step 3: Design the Tab & Customize
Now, the best part. You can design your shipping tab with rich design options.
- From the Product Tab, Navigate to the Style
- Move to the Tab Style Tab, and Scroll to the General Settings Tab.
- Choose your desired Tab Layouts (Horizontal, Vertical, Accordion), then customize the position, alignment, and other settings according to your store’s needs.
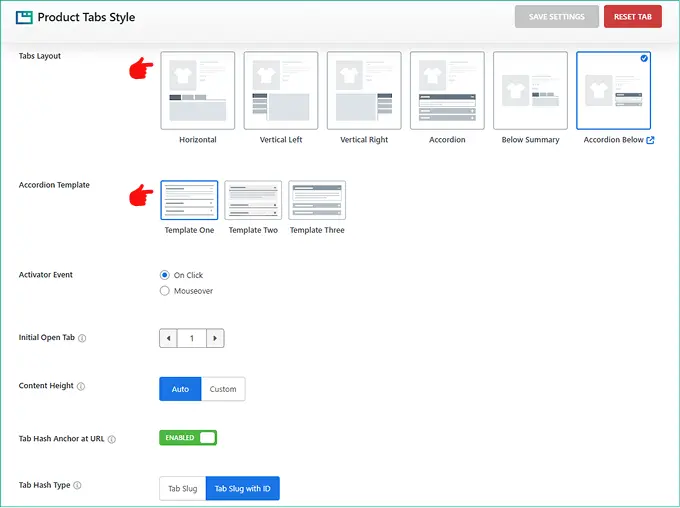
Then, from the Tab Display Settings, choose your preferred Tab Style (Classic, Line, Button, or Rounded).
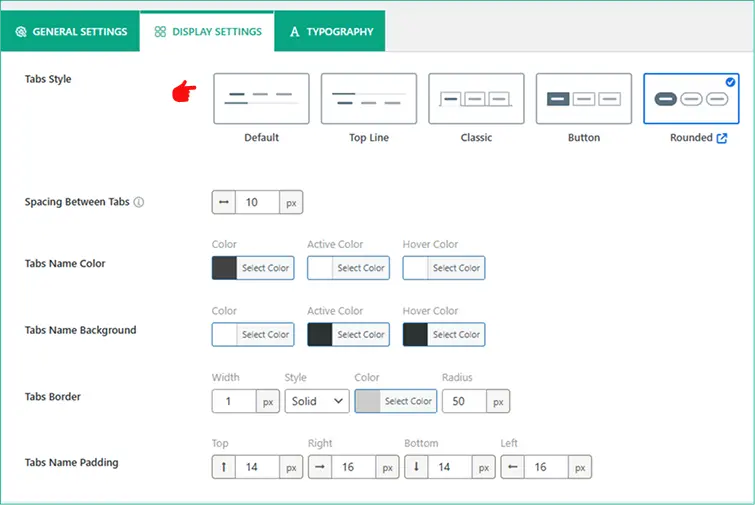
- Set your brand typography and other elements according to your brand.
Finally, click the Save Settings button, and the Shipping Info Tab will now appear on the WooCommerce product page.
What’s more? Smart Tabs gives you more control over each tab. You can override tab content per product and hide it from any specific product you want without any limits. It’s super easy. Just follow the steps below.
How to Edit or Hide Shipping Info Per Product
- Open your desired product, click on it to edit.
- Scroll down, and go to the Product Tabs.
- A navigation will open based on the tabs you created and assigned to it.
- Decide which tab you want to edit or hide. To hide the Shipping Info tab, check it mark.
- If you want to edit it, you need to check the mark override option once you have created the tab. And, you will find an option to edit it from the product level using the WYSIWYG editor.
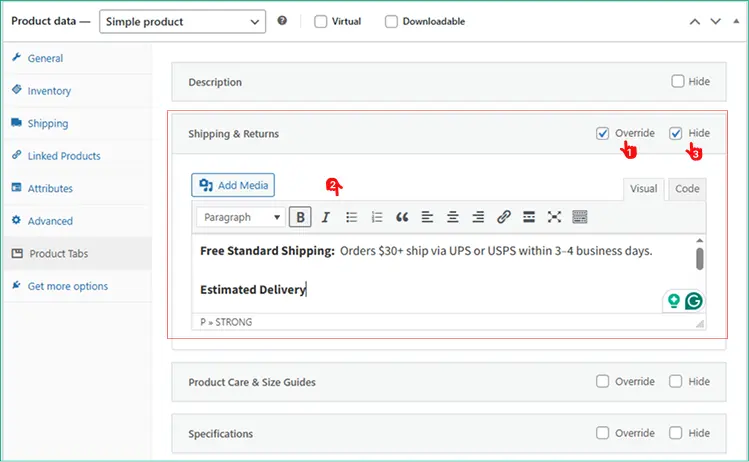
- Save the product. Congratulations!
5 Tips to Create an Effective Shipping Info Tab
- Keep information short and scannable; use bullet points or tables for clarity.
- Use international shipping disclaimers if you ship globally — avoid confusion.
- Maintain clear design consistency with other product tabs (same font, spacing).
- Update shipping details when there are changes (holidays, delays, price changes).
- Add a link to the full store shipping policy for more detailed info.
Final Thoughts
A clear Shipping Info tab doesn’t just answer customers’ questions — it builds trust, reduces cart abandonment, and improves sales.
So, don’t wait! Download Smart Tabs today, and add a beautifully organized, customizable Shipping Info tab to any WooCommerce product page in minutes.


Leave a Reply